|
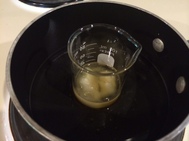
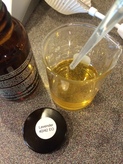
Do you ever wonder what is in some of the products you put onto your skin? Well, lately I have gotten a bit paranoid about many of the products that are available. So when my dearest friend's son had his first child with his wife, I wanted to make sure that what they put on that new baby bum was all natural and not that nasty petroleum based gel (you know what one I mean) that really is not a good choice at all! I was on a mission to come up with a recipe that was all natural, gentle enough for a new baby's bum, had good-for-the-skin ingredients and did the job on rashes and minor skin irritations. It was a tall order but follow along and you'll see what I found! 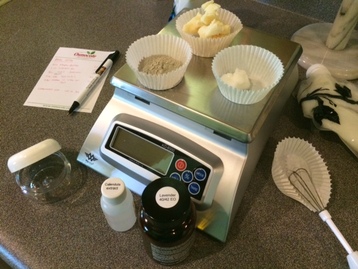 In my research, I found that clays are a wonderful source of nutrients for the skin with the natural drying and de-toxifying properties I was looking for. In this recipe, I decided to use bentonite clay for its healing properties, its ability to draw out toxins from the skin and its release of needed minerals. Plus it has been found to be effective against Candida albicans which is a fungus that grows as a yeast infection targeting baby bums and the genitalia and oral areas of humans in general. Along with some bentonite clay, I used Mango butter and coconut oil for their skin-softening properties, the anti-bacterial properties of coconut oil and Lavender essential oil, and healing and soothing Calendula extract. Let's get started!
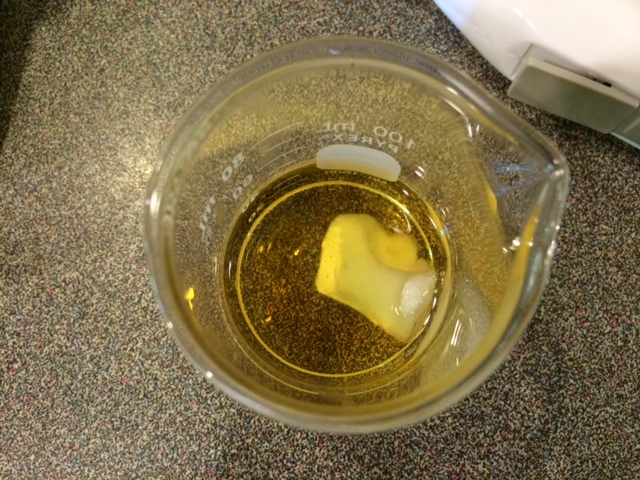
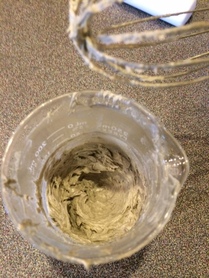
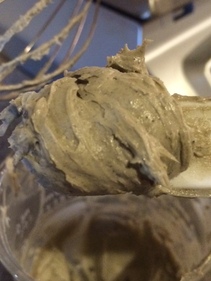
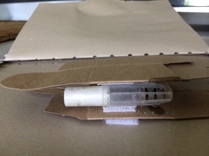
Time to chill out! Once all these ingredients are mixed in well, it's time to chill the mixture until it starts to set up. By chilling it, I can speed up the process a bit but it will solidify on its own at room temperatue...just a lot slower. As it is, chilling can take 30-60 minutes! 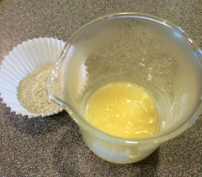 As you can see in this photo, the oils and butter have turned from a golden yellow to a butter yellow. It's about the consistency of semi-stiff butter. The bentonite clay on the left is an all natural clay that is grayish in color due to its aged volcanic ash makeup. I use this unrefined clay to keep all the natural nutrients intact. Some bentonite clay on the market is whiter and more refined losing many of its nutrients.
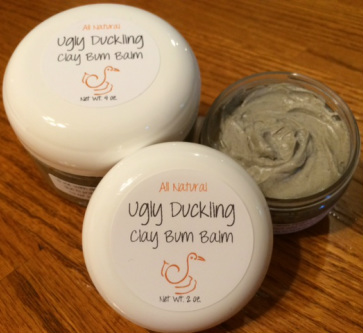 It's all in a name....
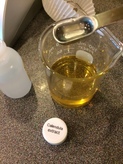
Naming this new creation was a challenge since the balm is chock full of good ingredients all chosen for their special properties, but it really is U...G...L...Y. My son who has been best friends with the new dad since kindergarten days was the one who suggested the name of "Ugly Duckling"...so you can see that this new bum balm was truly a family project! Labels were then designed and applied making it all ready for the next tiny bum that needs a little TLC! ~ Thanks to little Leah Ryan Y. who was the inspiration behind "Ugly Duckling Clay Bum Balm"! ~
2 Comments
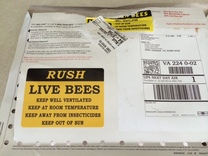
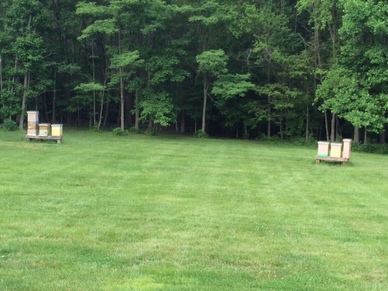
 Dad, Master Beekeeper Dad, Master Beekeeper My Dad was a beekeeper most of his life. He learned the skills from his grandfather when he was a kid. He dabbled with the bees as his 5 children grew up (but my Mom found that bees and kids didn't always mix well). So it wasn't until he retired at 65 that he got into full-fledged beekeeping again. Over the next 29 years, he was active with the bees each day and night, building all the equipment needed to manage his hives, supplying beekeeping products for local beekeepers, mentoring new beekeepers, bottling and selling his honey and loving life with his bees in central PA. In the spring of 2012, Dad had gotten his grandson (my son) into the world of beekeeping by making all the supers and frames needed to set up a new hive and mentored him with his first colony at his home in VA. He was passing on his love of these incredible creatures to his grandson like his grandfather had done for him so many years before. He adored the "girls", a nickname most beekeepers have for their hard-working bees, and was distraught when he was diagnosed with liver cancer at the tender age of 94 in June 2012 and had only days to live. It was bittersweet, but he asked my son if he would look after his hives for him. It was such a relief to him to know that the "girls" and his legacy would carry on. So that's how Dad's 6 hives of bees decided to make the move to the sunny south and I was recruited as "assistant" Bee-Mom.  Little did I know what we were getting into! Once you get over the initial fear of all the buzzing around your head, the bees are incredibly addicting and managing them is an exciting adventure. My son sure is a chip off his Pap's block...what a natural! During the spring and early summer, honeybees will increase their numbers quite quickly to build up the colony so more honey stores can be gathered. If they get too large for the space they are in, they will "swarm". Swarming happens when they get too crowded and the Queen basically tells them that she is taking some of the colony with her and moving out to another space. Those bees that are left behind will then generate a new Queen and build up their numbers yet again when, all the while, the old Queen has found another suitable space (i.e. a hollow tree, an old building, your attic, etc.) to settle into with her part of the colony that followed her. As a beekeeper, one must monitor this "swarming" activity before it happens and split the colony. If the colony swarms, the beekeeper will lose half of the bees, but if the colony is split before the swarm, two colonies can be made from the original one. Once a split is done, often-times a beekeeper will introduce a new Queen into the old colony so their "downtime" in minimized. This past week, I was able to help with that introduction (ok, so I stood back and watched...but I was ready to jump in if Luke needed help).
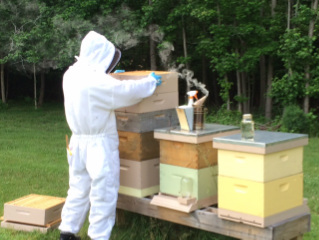 Once the real beekeeper got home, we were able to install each Queen into her new home. It's done by placing her in her cage within the frames of the lower super (box). As the bees in the hive cluster around the Queen's cage, they smell each other and get familiar. The bees eat away at the sugar plug which can take 24-48 hours depending on the number of bees and release the Queen. By the time the Queen is set free, all the bees are friends (well, we hope so!) and the Queen gets to work laying more eggs and building up the colony!
|

Welcome to Tailored Tidbits!If I'm not in the kitchen cooking up new items for my shop, I'm sewing fabric baskets, taking care of our honeybees, pitching in on the latest project at my son's, or planning a trip somewhere with my daughter. Here, I'll share a "day in the life" at Tailored Touches! 
Sign up for the newsletter for an instant 10% off coupon.
Categories
All
Archives
February 2019
|
 RSS Feed